

A Tale of Debugging: The Competitive Programmer Approach (Part II)
Stress testing with a proper tool...

Computer Scientist from the University of Havana with experience in Software Development and a passion for Competitive Programming and Algorithms.
Writing about the topics I know whenever I can.
Coding in Python and C++ lately.
A month ago, I wrote about how competitive programmers debug their solutions during competitions by taking advantage of randomization and the computing power in the devices we use daily. That article was selected as one of the winners of the DebuggingFeb Writeathon and got a lot of visibility from the Hashnode community.
The feedback from some of the readers was the best thing that came along with all the visibility. Those readers are what I like to call Active, those who don't stop at the end of the article but instead keep asking questions and suggesting improvements.
One of the more frequent requests was if I could try to make this debugging mechanism more similar to a tool that could be used easily in our everyday coding tasks.
This article is about my proposal for you who keep pushing the limits of knowledge by asking the right questions and giving the proper suggestions.
If you haven't read the article that motivated this one yet, I recommend you to read it here. After you get familiar with the topic we will discuss, please dive into the next section and read through the whole article.
Let's go!
Stress Testing
While I refrained from naming this technique in the first article, it has a proper name in the software developer community. That name is Stress Testing.
According to Wikipedia, Stress Testing can be defined as:
Stress testing is a software testing activity that determines the robustness of software by testing beyond the limits of normal operation. Stress testing is particularly important for "mission critical" software, but is used for all types of software. Stress tests commonly put a greater emphasis on robustness, availability, and error handling under a heavy load, than on what would be considered correct behavior under normal circumstances.
Even though this definition is more suitable for real-life software development situations, it can be extrapolated to our use case. Especially because of the "under a heavy load" part.
I recall that the main advantage of this approach to test solutions is the capacity to generate thousands of test cases and run them in seconds. If that isn't a heavy load, then what is?
The approach of generating thousands of small sample cases to test one solution is not only used by competitive programmers when they try to find bugs during competitions. The problem-setters also use it when they want to determine if a proposed solution for a problem is indeed correct.
I have been on both sides, and I can tell that the benefits are remarkable. The speed at which you can find counter-tests to your solutions increases at least by a factor of 10. This allows you to spend less time debugging solution proposals and more time on important things.
The Sample Problem
Let's recall the problem we solved last time. The statement was the following:
"Given a sorted array of integers, and an integer
x, find the first index of the array containing the numberxor return-1in case the number doesn't appear on the array".
We can solve this problem with a naive solution that iterates through the list from left to right and stops as soon as it finds an element equal to x. If it reaches the end of the list without finding the element we are looking for, it returns the value -1.
A possible implementation in python is the following:
# solutions/naive.py

def naive(a, x):
    return next((i for i in range(len(a)) if a[i] == x), -1)


if __name__ == "__main__":
    num_list = list(map(int, input().split()))
    x = int(input())
    print(naive(num_list, x))
This solution, even though it's correct, is not fast enough. It is performing a linear search through the entire list, which results in a time complexity of O(n), which is good enough, but we can do better.
To improve our solution, we should notice that we are not taking advantage of the fact that our input list is sorted. This means that we can make use of the binary search algorithm to look for the number x.
Our improved solution would be something like this:
# solutions/solution.py

def solution(a, x):
    l = 0
    r = len(a) - 1
    while l <= r:
        m = (l + r) // 2
        if a[m] == x:
            return m

        if a[m] < x:
            l = m + 1
        else:
            r = m - 1
    return -1


if __name__ == "__main__":
    num_list = list(map(int, input().split()))
    x = int(input())
    print(solution(num_list, x))
By using binary search, we have reduced the time complexity of our solution to O(n log n). But unfortunately, this solution has a bug.
How to find it, then? We could spend hours trying to generate manual test cases to check where is that our solution fails.
Well, here is where we benefit from generating randomized cases. And here is my new proposal to do so.
Stress Tester Tool
Let's create a new project with the following structure:
stress_tester
|-- generators
|---|-- random_generator.py
|-- solutions
|---|-- naive.py
|---|-- solution.py
|-- test_cases
As you can see, it contains a "generators" folder with the generator files. In our case, we will just use a random generator, but sometimes more specific generators are necessary.
It also contains a "solutions" folder that will store our naive solution for the problem and the solution we want to test.
Lastly, we created a "test_cases" folder that will store all the test cases we generate to inspect them whenever we find a difference in the output of our solutions.
The generator we are going to use for this example is this one:
# generators/random_generator.py

import random


def generate_input():
    n = random.randint(1, 10)
    a = [random.randint(1, 10) for _ in range(n)]
    a.sort()
    x = a[random.randint(0, n - 1)]
    return a, x


if __name__ == "__main__":
    a, x = generate_input()
    print(" ".join([str(elem) for elem in a]))
    print(x)
Ideally, what we want is to generate random test cases, supply them (one at a time) to both our solutions, and stop when the outputs returned to a given input are different. Then, we can examine the test case that makes our solution fail and start fixing our bugs.
Let's automate this process!
Automating with a shell script
Shell scripting seems to be the go-to option here. This is used widely in tasks related to automation in areas such as Operative Systems and Networking. In our case, we will be using it to link existing programs together.
The fact is that the output generated by our random_generator program should be supplied as the input to both our naive and solution programs. Once again, the outputs of these two programs should be supplied as input to some other program that tells whether they are different or not.
The good thing is that a simple shell script can help us achieve all that without much effort.
Let's create a file in the root of the project and call it check.sh. The content of the file should be this:
# check.sh

# Number of test cases
TEST_CASES=100

# Commands to execute python scripts
RUN_GENERATOR="python3 ./generators/random_generator.py"
RUN_SOLUTION="python3 ./solutions/solution.py"
RUN_NAIVE="python3 ./solutions/naive.py"

# Test directory
TEST_CASES_DIRECTORY="./test_cases"

# Console Colors
RESET_COLOR="\x1b[0m"
OK_COLOR="\x1b[32m"
WA_COLOR="\x1b[31m"

echo "Starting stress testing with $TEST_CASES test case(s)..."

mkdir -p "$TEST_CASES_DIRECTORY" # Create directory to store test cases
for i in `seq -f "%0${#TEST_CASES}g" 1 $TEST_CASES`
do
    INPUT="$TEST_CASES_DIRECTORY/input-$i.in"

    eval "$RUN_GENERATOR" > "$INPUT"  # Generate a test case
    DIFF=$(diff -w <(eval "$RUN_SOLUTION" < "$INPUT") <(eval "$RUN_NAIVE" < "$INPUT"))  # Evaluate the test case in both solutions and get their output differences
    if [ "$DIFF" == "" ] ; then  # Same output
        echo -e " • Test case $i: ${OK_COLOR}OK!${RESET_COLOR}"
    else  # Different output
        echo -e " • Test case $i: ${WA_COLOR}Wrong Answer!${RESET_COLOR}"
        break
    fi
done
Let's explain what's happening in this code:
We define necessary variables such as the number of test cases we are going to run, the commands to execute our generator and solution python scripts, and the colors to display in the console.
We iterate from
1to the number of cases we defined. Each time, we call the generator script and redirect the output to a file using the>operator.Then, we supply this file as input to both solutions using the
<operator and check for differences using thediffcommand.If no differences are found, we print
OK!to the console and proceed to the next test case. Otherwise, we printWrong Answer!and stop the script.
To execute this script, we need to type the following command in our console when we are at the root of our project:
./check.sh
An output similar to this should appear on your console after executing the command:
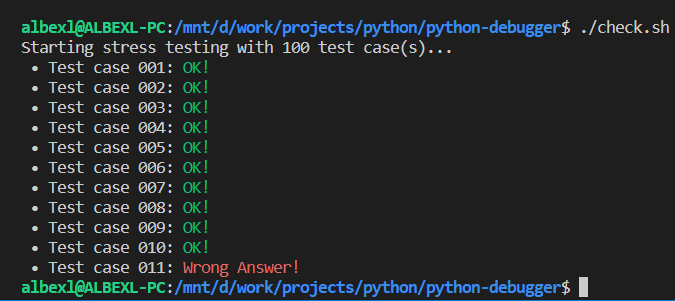
In my case, it detected a difference in the outputs on case number 11. Now I have to go and analyze that case and try to fix the bugs in my code. This will be much easier now that I know of a case where my solution fails.
When we finish fixing our buggy solution, we can run the script again to check if it passes all the test cases. Hopefully, you will get a result similar to this one:
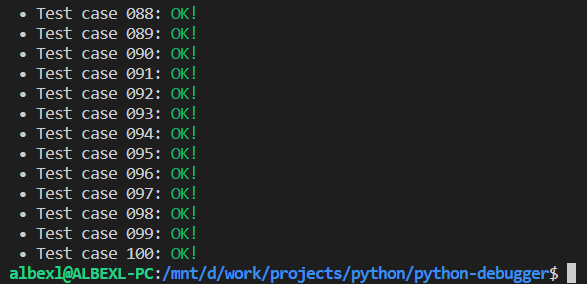
Otherwise, fix your solution again until you do. Now you will have a new test case to analyze.
Automating with a python script
Even though we have a solution that uses a shell script to automate the checking process, it still has some implementation details that I don't like. The most important for me is that the variables we use are fixed in the code.
Let's say, for example, that we want to change the directory where our solutions are or where we store the test cases. We would have to go to the script and change the value of those variables by hand.
While looking for a better solution, I figured it would be better if the values of the variables we need to make our script work could be passed as arguments through the CLI. Since I don't know much about the shell scripting language, I decided to create an alternative using python.
We are going to create a check.py file at the root of our project. This file will contain a similar logic to the one in our shell script, but it will also include parsing arguments from the CLI.
To parse arguments from the CLI in python, I usually go for the argparse library. It is simple enough, and the documentation is excellent. It will help you create applications that receive arguments from the console instantly.
Let's see an example of how a function that parses the arguments we need will look like:
# check.py

def parse_args():
    parser = argparse.ArgumentParser()
    parser.add_argument("--test-cases", type=int, required=True)
    parser.add_argument("--generator-path", required=True)
    parser.add_argument("--solution-path", required=True)
    parser.add_argument("--naive-path", required=True)
    parser.add_argument("--tests-path", required=True)
    return parser.parse_args()
As you can see, for our script to work, we need to specify the values for the following variables:
test-cases: The number of test cases to execute.generator-path: The path to the generator file.solution-path: The path to the solution file.naive-path: The path to the naive solution file.tests-path: Directory to store the test cases.
After all our variables have been parsed, we need to call the function that will execute the same workflow that the shell script does. To achieve this behavior from a python script, I used the subprocess library, which allows the execution of commands in the console and redirects inputs and outputs. For the colors, I used the colorama library.
Here is an example of how this function could look like:
# check.py

def check(
    test_cases: int,
    generator_path: str,
    solution_path: str,
    naive_path: str,
    tests_path: str,
) -> bool:
    print(f"Starting stress testing with {test_cases} test case(s)...")
    for i in range(1, test_cases + 1):
        # Generate random test case
        with open(f"{tests_path}/input-{i}.in", "w", encoding="utf-8") as test_case:
            subprocess.run(["python3", generator_path], stdout=test_case)

        # Open test case input file
        with open(f"{tests_path}/input-{i}.in", "r", encoding="utf-8") as test_case:
            # Run solution and store the output in a file
            with open(f"{tests_path}/solution-{i}.out", "w", encoding="utf-8") as solution_file:
                test_case.seek(0)
                subprocess.run(["python3", solution_path], stdin=test_case, stdout=solution_file)

            # Run naive solution and store the output in a file
            with open(f"{tests_path}/naive-{i}.out", "w", encoding="utf-8") as naive_file:
                test_case.seek(0)
                subprocess.run(["python3", naive_path], stdin=test_case, stdout=naive_file)

            # Check for differences in both output files
            output = subprocess.run(
                ["diff", f"{tests_path}/solution-{i}.out", f"{tests_path}/naive-{i}.out"], stdout=subprocess.PIPE
            )

            # Return code different from 0 means that the outputs differ
            if output.returncode == 0:
                print(f" • Test case {i}: {Fore.GREEN}OK!{Fore.WHITE}")
            else:
                print(f" • Test case {i}: {Fore.RED}Wrong Answer!{Fore.WHITE}")
                return False
    return True
And our main function would look like this:
# check.py

def _main():
    args = parse_args()
    check(
        args.test_cases,
        args.generator_path,
        args.solution_path,
        args.naive_path,
        args.tests_path,
    )


if __name__ == "__main__":
    _main()
To execute this script, it is necessary to run the following command at the root of the project:
python3 check.py --test-cases 100 --generator-path ./generators/random_generator.py --solution-path ./solutions/solution.py --naive-path ./solutions/naive.py --tests-path ./test_cases
As you can see, now it is possible to modify the values of the parameters from the CLI without having to affect the code. For example, we could increase the number of test cases we want to run to 1000.
After we run this command, we get the following output in our console:
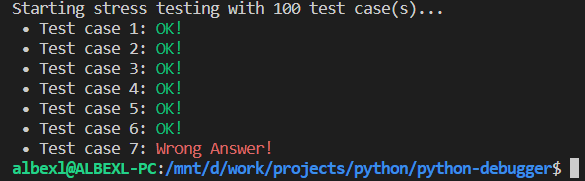
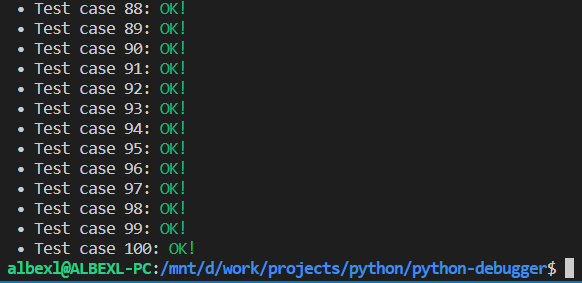
Now, it failed test case number 7. After inspecting the test case and fixing our solution, we should get something like this:
Conclusions
In this article, we have learned how to create an automated tool to stress-test our solutions against randomly-generated test cases. We automated the process using a shell script and then we made a python version making use of libraries such as argparse and subprocess.
To be able to find counter-tests to your solutions is a crucial aspect of software development. Even though this is an educational, simple example, it has multiple similarities to cases of real life. Try this out, and let me know your thoughts about it!
Also, I would like to keep improving this tool a little, but I don't have much time to do it alone. It would be great to have some contributors to the GitHub repo where I keep the code used in this article. I started writing some possible improvements. Reach out to me if you want to collaborate on this.
See you soon!
Sources
Code examples used in this article can be found here.
Stress Testing (Wikipedia): Article from Wikipedia about stress testing in software.
How to test your solution in Competitive Programming by Kamil Debowski: Youtube video explaining some of the topics discussed, with code examples in C++.
👋 Hello, I'm Alberto, Software Developer at doWhile, Competitive Programmer, Teacher, and Fitness Enthusiast.
🧡 If you liked this article, consider sharing it.


